https://www.youtube.com/watch?v=ED2H_y6dmC8
02:55:05
개발을 하다보면 시간이 오래 걸리는 작업을 처리해야 할 때가 있다.
inngest를 활용해 백그라운드 작업을 구현하는 방법을 다뤄본다.
- Setup Inngest - Inngest를 설정한다 (이벤트 기반 백그라운드 작업/워크플로우 도구 설정)
- Create a background job - 백그라운드에서 실행될 작업(job)을 생성한다
- Add mprocs - mprocs를 추가해 여러 프로세스를 동시에 관리/실행한다
작업 시작전 백그라운드 작업이 필요한 이유 보기.
* 동기식 처리 방식
- 일반적인 동기 처리 방식에서는 사용자가 요청을 보내면 서버에서 모든 작업을 완료한 후 응답을 반환한다.
// 동기적(synchronous) 작업 처리 방식

┌────────────────────────────┐
│  사용자가 '로그인' 클릭         │
└────────────────────────────┘
              │
              ▼
┌────────────────────────────┐
│      요청 전송               │
└────────────────────────────┘
              │
              ▼
┌────────────────────────────┐
│ 즉각적인 응답 (성공 / 실패)      │
└────────────────────────────┘
- User clicks "Login" → 사용자가 “로그인” 버튼을 클릭함
- Send request → 서버로 요청을 보냄
- Instant response (success/fail) → 즉각적인 응답 반환 (성공 / 실패)
백그라운드 작업이 없을 시
- 장시간 작업을 동기 요청으로 처리하면 UX와 안정성이 크게 저하됨
- 사용자는 기다리다 이탈할 수 있고, 결과를 영영 못 받을 수도 있음
- 이런 문제를 해결하기 위해 백그라운드 작업(Background Jobs) 이 필요
┌────────────────────────────────────────┐
│ 사용자가 '요약 생성' 클릭                   │
└────────────────────────────────────────┘
                 │
                 ▼
┌────────────────────────────────────────┐
│ 네트워크 요청 전송                         │
└────────────────────────────────────────┘
                 │
                 ▼
┌────────────────────────────────────────┐
│ 백엔드에서 요약 생성                        │
│ (약 30초 소요)                           │
└────────────────────────────────────────┘
                 │
                 ▼
┌────────────────────────────────────────┐
│ 사용자는 계속 대기함                        │
└────────────────────────────────────────┘
                 │
                 ▼
┌────────────────────────────────────────┐
│ 위험 요소 발생 가능                        │
│ - 타임아웃                               │
│ - 브라우저 탭 종료                         │
│ - 네트워크 연결 끊김                       │
└────────────────────────────────────────┘
                 │
                 ▼
┌────────────────────────────────────────┐
│ 사용자가 결과를                            │
│ 받지 못할 수도 있음                        │
└────────────────────────────────────────┘
- User clicks "Generate Summary" → 사용자가 “요약 생성” 버튼을 클릭함
- Send network request → 네트워크 요청을 전송함
- Backend generates summary (30 seconds) → 백엔드에서 요약을 생성함 (약 30초 소요)
- User waits… → 사용자가 계속 대기함
- Risk: timeout / tab closed / connection lost → 위험 요소: 타임아웃 / 탭 종료 / 네트워크 연결 끊김
- User might never get result → 사용자가 결과를 아예 받지 못할 수도 있음
백그라운드 작업을 사용하는 경우
- UX 개선: 사용자가 기다리지 않아도 됨
- 안정성 향상: 타임아웃·연결 끊김 문제 제거
- 확장성 확보: 무거운 작업을 안전하게 처리 가능
- 현대적인 아키텍처: 이벤트/큐 기반 백그라운드 처리
┌────────────────────────────────────────────┐
│ 사용자가 '요약 생성' 클릭                        │
└────────────────────────────────────────────┘
                    │
                    ▼
┌────────────────────────────────────────────┐
│ 네트워크 요청 전송                             │
└────────────────────────────────────────────┘
                    │
                    ▼
┌────────────────────────────────────────────┐
│ 백그라운드 작업 큐에 등록                        │
└────────────────────────────────────────────┘
          │                          │
          │                          ▼
          │              ┌──────────────────────────┐
          │              │ 백그라운드 작업 실행          │
          │              └──────────────────────────┘
          │                          │
          │                          ▼
          │              ┌──────────────────────────┐
          │              │ 작업 완료 시 사용자 알림       │
          │              └──────────────────────────┘
          ▼
┌────────────────────────────────────────────┐
│ 즉시 응답 반환                                │
│ “요약을 생성 중입니다”                          │
└────────────────────────────────────────────┘
                    │
                    ▼
┌────────────────────────────────────────────┐
│ 사용자는 탭을 닫거나                            │
│ 다른 작업을 계속해도 됨                          │
└────────────────────────────────────────────┘
- Long-running task example (with background jobs) → 오래 걸리는 작업 예시 (백그라운드 작업 사용)
- User clicks "Generate Summary" → 사용자가 “요약 생성” 버튼을 클릭함
- Send network request → 네트워크 요청을 전송함
- Queue background job → 백그라운드 작업을 큐에 등록함
- Respond: "Summary is being generated" → “요약을 생성 중입니다”라는 즉시 응답 반환
- User free to close tab or move on → 사용자는 탭을 닫거나 다른 작업을 자유롭게 진행 가능
- Background job runs → 백그라운드 작업이 실제로 실행됨
- User notified when done → 작업 완료 시 사용자에게 알림 전달
프로젝트 설정
Prisma 스키마 작성
prisma/schema.prisma - Workflow 데이터를 저장할 테이블을 정의
model Workflow{
  id String @id @default(cuid())
  name String
}
데이터베이스 마이그레이션
중요: npx prisma generate 명령어를 실행해야 Prisma Client에서 새로운 모델을 인식할 수 있다. 이 단계를 빠뜨리면 TypeScript에서 prisma.workflow를 찾을 수 없다는 오류가 발생한다.
# 기본 마이그레이션
npx prisma migrate dev

# 마이그레이션 이름을 지정하는 방법 (권장)
npx prisma migrate dev --name workflows-table

# ⭐ 마이그레이션 후 Prisma Client 강제 재생성
npx prisma generate
tRPC 라우터 설정
src/trpc/routers/_app.ts
Workflow를 조회하고 생성하는 엔드포인트 생성.
기존의 getUsers를 getWorkflows로 변경하고, createWorkflow 뮤테이션을 추가
// 변경전

import { baseProcedure, createTRPCRouter, protectedProcedure } from '../init';
import prisma from '@/lib/db';
export const appRouter = createTRPCRouter({
  getUsers: protectedProcedure.query(({ctx}) => {
      return prisma.user.findMany({
        where:{
          id: ctx.auth.user.id
        }
      })
  }),
});
// export type definition of API
export type AppRouter = typeof appRouter;
// 변경 후
import { createTRPCRouter, protectedProcedure } from '../init';
import prisma from '@/lib/db';
export const appRouter = createTRPCRouter({
getWorkflows: protectedProcedure.query(({ctx}) => {
return prisma.workflow.findMany()
}),
createWorkflow : protectedProcedure.mutation(()=>{
return prisma.workflow.create({
data: {
name : "test-workflow"
}
})
})
});
// export type definition of API
export type AppRouter = typeof appRouter;
프론트엔드 구현
src/app/page.tsx
서버 컴포넌트에서 클라이언트 컴포넌트로 변경하고, React Query를 사용해 데이터를 조회
// 변경전

import { requireAuth } from "@/lib/auth-utils"
import {caller} from "@/trpc/server"
import { LogoutButton } from "./logout";

const Page = async() =>{

  await requireAuth();

  const data = await caller.getUsers();

  return(
    <div className="min-h-screen min-w-screen flex items-center justify-center">
      로그인한 사용자만 접근 가능
      <div>
        {JSON.stringify(data, null, 2)}
      </div>
      <LogoutButton/>
    </div>
  )
}

export default Page
// 변경 후
"use client"
import { Button } from "@/components/ui/button";
import { LogoutButton } from "./logout";
import { useTRPC } from "@/trpc/client";
import { useMutation, useQuery, useQueryClient } from "@tanstack/react-query";
const Page = () => {
const trpc = useTRPC();
const queryClient = useQueryClient()
const {data} = useQuery(trpc.getWorkflows.queryOptions())
const create = useMutation(trpc.createWorkflow.mutationOptions({
onSuccess: () => {
// 생성 성공 시 목록을 다시 불러옴
queryClient.invalidateQueries(trpc.getWorkflows.queryOptions())
}
}))
return(
<div className="min-h-screen min-w-screen flex items-center justify-center">
로그인한 사용자만 접근 가능
<div>
{JSON.stringify(data, null, 2)}
</div>
<Button
disabled={create.isPending}
onClick={() => create.mutate()}
>
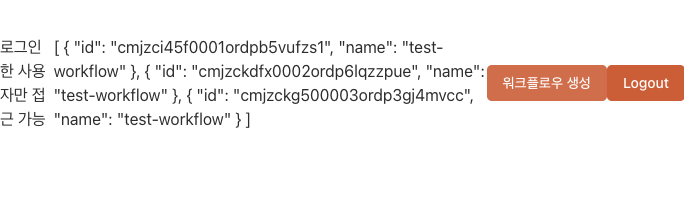
워크플로우 생성
</Button>
<LogoutButton/>
</div>
)
}
export default Page
Inngest 설정
백그라운드 작업 / 이벤트 기반 워크플로우를 만들기 위한 라이브러리를 설치
Inngest - AI and backend workflows, orchestrated at any scale
Inngest's durable functions replace queues, state management, and scheduling to enable any developer to write reliable, multi-step code faster without touching infrastructure.
www.inngest.com
npm install inngest

npm install inngest@3.44.1
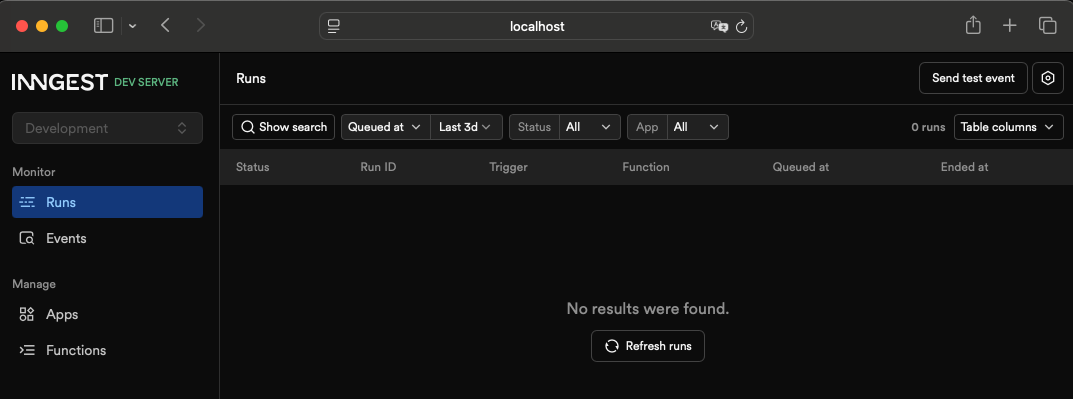
npx --ignore-scripts=false inngest-cli@latest dev -u http://localhost:3000/api/inngest
http://localhost:8288/runs
이제 여기서 백그라운드에서 일어나고 있는 일들을 확인할 수 있다.
Inngest 클라이언트 생성
src/inngest/client.ts
import { Inngest } from "inngest";

export const inngest = new Inngest({ id: "nodebase" });
API 라우트 설정
src/app/api/inngest/route.ts
import { serve } from "inngest/next";
import { inngest } from "@/inngest/client"

export const {GET, POST, PUT} = serve({
  client: inngest,
  functions:[

  ]
})
백그라운드 함수 작성
src/inngest/functions.ts
import { inngest } from "./client";

export const helloWorld = inngest.createFunction(
  { id: "hello-world" },
  { event: "test/hello.world" },
  async ({ event, step }) => {
    await step.sleep("wait-a-moment", "1s");
    return { message: `Hello ${event.data.email}!` };
  },
);
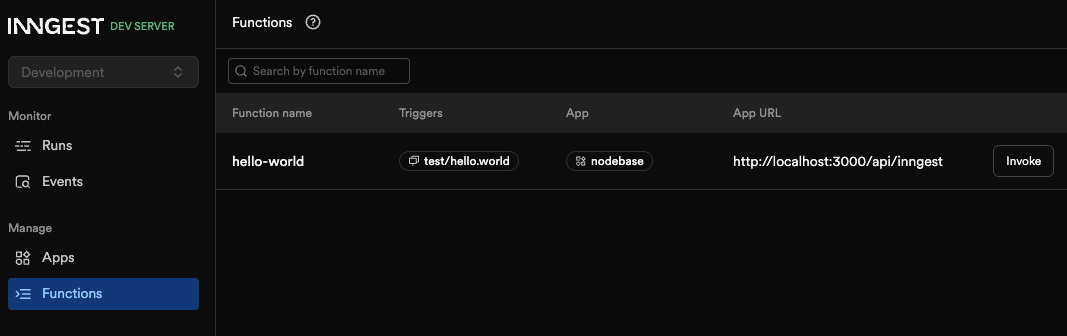
함수 등록
src/app/api/inngest/route.ts function에 helloworld 추가
import { serve } from "inngest/next";
import { inngest } from "@/inngest/client"
import { helloWorld } from "@/inngest/functions";

export const {GET, POST, PUT} = serve({
  client: inngest,
  functions:[
    helloWorld
  ]
})
실행 후 http://localhost:8288/runs 에서 백그라운드 작업을 모니터링할 수 있다.
백그라운드 워크플로우 구현
tRPC에서 이벤트 발행
src/trpc/routers/_app.ts
import { inngest } from '@/inngest/client';
import { createTRPCRouter, protectedProcedure } from '../init';
import prisma from '@/lib/db';
import { resolve } from 'path';

export const appRouter = createTRPCRouter({
  getWorkflows: protectedProcedure.query(({ctx}) => {
      return prisma.workflow.findMany()
  }),
  createWorkflow : protectedProcedure.mutation(async()=>{

    // 일반적인 백그라운드 워크플로우 예시
    // // 1️⃣ 비디오 가져오기 (외부 API / 스토리지)
    // await new Promise((resolve) => setTimeout(resolve, 5_000))

    // // 2️⃣ 비디오 → 텍스트 변환 (무거운 연산)
    // await new Promise((resolve) => setTimeout(resolve, 5_000))

    // // 3️⃣ OpenAI로 전송해서 요약/분석
    // await new Promise((resolve) => setTimeout(resolve, 5_000))


    await inngest.send({
      name: "test/hello.world",
      data: {
        email:"zzuny@zzuny.com"
      }
    });

    return prisma.workflow.create({
      data: {
        name : "test-workflow"
      }
    })
  })
});
// export type definition of API
export type AppRouter = typeof appRouter;
백그라운드 함수 개선
src/inngest/functions.ts
- retries 재시도 획수 제어(없어도 댐)
import prisma from "@/lib/db";
import { inngest } from "./client";

export const helloWorld = inngest.createFunction(
  { id: "hello-world", retries: 5 },
  { event: "test/hello.world" },
  async ({ event, step }) => {

    // 비디오 가져오기 (외부 API / 스토리지)
    await step.sleep("비디오 가져오기", "1s");
    // 비디오 → 텍스트 변환 (무거운 연산)
    await step.sleep("비디오 → 텍스트 변환", "1s");
    // OpenAI로 전송해서 요약/분석
    await step.sleep("OpenAI로 전송해서 요약/분석", "1s");

    // return { message: `Hello ${event.data.email}!` };
    await step.run("create-workflow", () => {
        return prisma.workflow.create({
            data: {
                name: "workflow-from-inngest"
            }
        })
    })
  },
);
프론트엔드 UX 개선
src/app/page.tsx
프론트에는 바로 toast.success("작업 성공") 메시지를 던져.
사용자는 이게 작업성공인걸 알았으니까. 작업이 완성되면 화면이 고쳐지겟지?
"use client"

import { Button } from "@/components/ui/button";
import { LogoutButton } from "./logout";
import { useTRPC } from "@/trpc/client";
import { useMutation, useQuery, useQueryClient } from "@tanstack/react-query";
import { toast } from "sonner";

const Page = () => {
  const trpc = useTRPC();
  const queryClient = useQueryClient();
  const { data } = useQuery(trpc.getWorkflows.queryOptions());

  const create = useMutation(trpc.createWorkflow.mutationOptions({
    onSuccess: () => {
      // queryClient.invalidateQueries(trpc.getWorkflows.queryOptions())
      // 즉시 성공 메시지 표시
      toast.success("작업 성공");
      // 백그라운드에서 작업이 완료되면 자동으로 화면이 업데이트됩니다
    }
  }));

  return (
    <div className="min-h-screen min-w-screen flex items-center justify-center">
      <div>로그인한 사용자만 접근 가능</div>
      <div>
        {JSON.stringify(data, null, 2)}
      </div>
      <Button
        disabled={create.isPending}
        onClick={() => create.mutate()}
      >
        워크플로우 생성
      </Button>
      <LogoutButton />
    </div>
  );
}

export default Page;
보너스: mprocs로 개발 환경 개선
- 여러 프로세스를 동시에 실행하고 관리할 수 있는 도구
https://github.com/pvolok/mprocs
GitHub - pvolok/mprocs: Run multiple commands in parallel
Run multiple commands in parallel. Contribute to pvolok/mprocs development by creating an account on GitHub.
github.com
mprocs 설치
npm install -g mprocs
npm i -D inngest-cli
mprocs.yaml 설정 파일 작성
procs:
  inngest:
    cmd: ["npm", "run", "inngest:dev"]

  next:
    cmd: ["npm", "run", "dev"]
package.json package.json 스크립트 추가
"scripts": {
    "dev": "next dev --turbopack",
    "build": "next build --turbopack",
    "start": "next start",
    "lint": "biome check",
    "format": "biome format --write",
    "inngest:dev": "inngest-cli dev",
    "dev:all": "mprocs"
  },
실행
npm run dev:all

이제 한 번의 명령으로 Next.js 개발 서버와 Inngest Dev Server를 동시에 실행할 수 있다.
'Clone Coding' 카테고리의 다른 글
| N8N & Zapier - Error Tracking (0) | 2026.01.06 |
|---|---|
| N8N & Zapier - AI providers (1) | 2026.01.05 |
| N8N & Zapier - Theme & styling (0) | 2025.12.31 |
| N8N & Zapier - Authentication (0) | 2025.12.31 |
| N8N & Zapier - tRPC 설정 (1) | 2025.12.29 |


